Backpacking The Narrows

Hiking the Narrows is essentially about hiking in the Virgin river lined by majestic slot canyons on both sides, an experience like no other. The best part is that it can be tailored to suit all fitness and skill levels. This guide highlights different ways in which the Narrows can be experienced depending on hikers’ skill and interest levels.
Hike Details
The Narrows can be hiked in the following two directions:
- Bottom-up – Day hike up to 10 miles round trip
- Top-down – 16 miles point-to-point. There are two options to hiking in this direction:
Bottom-up hike
This day-hike option is suitable for those looking to explore the Narrows with anywhere between 4-6 hours at hand. You don’t need a permit to hike in this direction.
- Trail type: Out and back
- Trailhead: Temple of Sinawava
- Trail length: ~9.0 miles roundtrip. However, you always have the option to turn around and head back from any point.
- End of trail : Big springs; ends at a waterfall
- Distance to the trailhead from visitor center : 8.0 miles
- Transportation from the visitor center to the trailhead and back :
- There is a free National park shuttle service that will transport hikers to and from the visitor center. Click here for shuttle timings, frequency and stops.
- There are private shuttle companies like the Zion Adventure company, Zion Guru etc. that offer paid pick up and drop off services to the trailhead.
- Pros of hiking in this direction: You get to decide how far and long you want to hike.
- Cons: It’s more touristy and crowded. As this is the more popular route because of flexibility in terms of trail length, expect to encounter big crowds throughout the hike, especially during peak seasons.
Top-down hike
- A permit is required to hike the Narrows in this direction.
- Trailhead: Chamberlain’s Ranch – This is a privately owned ranch that does not belong to the National Park premises.
- End of trail: Temple of Sinawava
- Trail type: Point-to-point
- How far is the trailhead: ~35 miles, the drive takes close to 1.5 hours from the visitor center
- How to get to Chamberlain’s Ranch:
- Pre-book a private shuttle as the National Park shuttle service is not available outside of the park premises. There are several private companies offering shuttle services to the trailhead, some of them being Zion Adventure company, Red rock shuttle & tours and Zion Guru.
- Tip: Book a private shuttle to Chamberlain’s Ranch well in advance of the trip – ideally, soon after receiving an e-mail confirmation from NPS with camping or hiking permits
- Tip: Book the earliest available shuttle to Chamberlain’s Ranch, especially if you choose to hike the Narrows in one day. Most early shuttles depart between 6:00 am and 6:30 am and arrive at the trailhead around 8:00am.
- How to get to the visitor center after completing the hike: There are two ways
- Use the free National Park shuttle service. Click here for shuttle timings, frequency and stops.
- Use complimentary drop off services offered by private shuttle companies. This option may not always be available. Please confirm availability of drop off and shuttle timings with the same company that drives you to the trailhead.
- Tip: Highly recommend taking the same private shuttle service back after finishing the hike, if available. This could shave off precious minutes from standing in long lines for the NPS shuttle, especially during peak seasons.
There are two ways to hike the Narrows in this direction.
16-mile day hike:
This option is for those looking to complete the hike in one day as a very long day hike.
- Camping: Not allowed
- Permit process:
- Secure a permit from here and choose “Virgin Narrows Day-use trail from Top (12)” in the “resource area” drop down menu.
- The permit itself will need to be physically picked up from the visitor center either on the day or the previous day of the hike.
- Tip: We recommend picking up the permit on the previous day of the hike so as to get an early start the next day.
- This option is suitable for relatively fast, experienced hikers.
16-mile overnight backpacking trip:
While researching ways to explore the Narrows, we learnt that spending a night under the towering canyon walls is very much an option, and we would not have it any other way. Although securing camping permits is highly competitive, if you are lucky enough to bag one, there is nothing like it. The intention of this post is to consolidate everything that is needed from securing permits to successfully completing this hike for all those who choose to backpack the Narrows.
- What is the permit process like for camping:
- Out of 12 campsites, 6 are available for advance reservations and the others are available on a walk-in basis.
- Create an account here
- Reservations are available on a first-come-first-serve basis online during a two-month time frame. On the 5th of every month at 10:00am mountain time, reservations for the next month become available. If available, reservations can be made until 5:00pm mountain time, the day before your trip. Please be aware that most spaces will become fully booked for the upcoming month within minutes of reservations opening.
- Secure a camping permit from here. From the drop-down menu choose any available Narrows site (1,3,5,7,9,12)
- Once you are able to successfully make the $5 payment and secure a campsite, you will receive an e-email confirmation but keep in mind that this is not the actual permit.
- The permit itself will need to be physically picked up from the visitor center either on the day or the previous day of the hike.
- Tip: Getting a camping permit becomes very competitive as the permits go out on a first-come-first-serve basis, so make sure to be on the website a few minutes before they become available.
- Tip: We recommend picking up the permit on the previous day of the hike so as to get an early start the next day.
- Duration: 2 days & 1 night
- Type of stay: Tent camping
- When hiking the Narrows top down, the first campsite you arrive at will be campsite 1 and the last would be campsite 12. Locations of all the campsites are equally good, well labeled and well spaced from each other. Most of them are close to the river except a few that are nestled away a little bit. Note that if you are in one of the first 4 campsites, you will leave a longer mileage for day 2. Similarly, if you are in one of the last 4 campsites, you will cover a longer distance on day 1. From personal experience, it felt easier to camp in one of the first four campsites since the backpack is heavier on day 1.
- Pros of hiking this direction: You have the canyons to yourself for the most of it as entry in this direction is limited by permits.
- Cons: It’s long and definitely tests endurance, there is no turning back once you are off the shuttle at Chamberlain’s Ranch. Permit system is highly competitive.

Our Experience
We started from the visitor center around 5:45 am. Since this was during a memorial day weekend, the parking lot was already starting to get full. We reached the Chamberlain’s Ranch trailhead around 8:00am. There is a small restroom at the trailhead. First three miles is a dry dirt-road across ranch land before entering the Virgin river. Once in, we followed the river flow throughout. The next 3 miles or so in the river is about easy wading and acclimatizing to walking on the river bed covered with rolling pebbles, not so much for views yet.
The next stretch is where the true shape and size of slot canyons start unfolding. There really was nothing more that we could ask for while cruising through narrow sections of the gorge and having it all to ourselves.
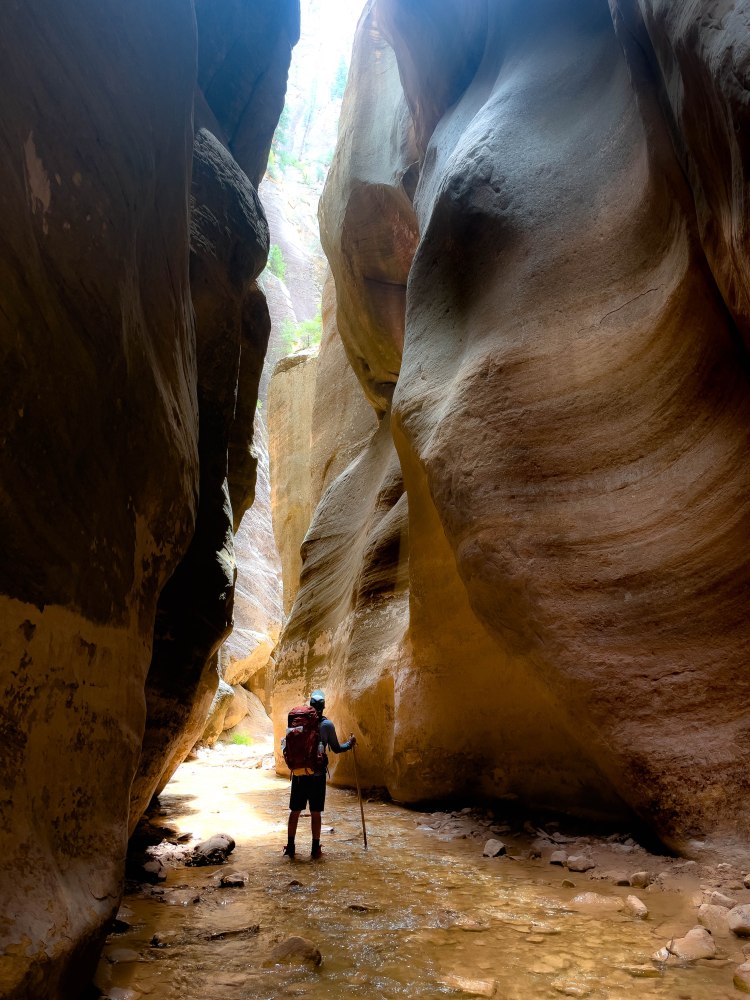
After about 8.5 miles, we reached the top of North Fork falls that seemed to block the trail. But there is a narrow, almost hidden passage to the left of the falls that got us to the bottom. We were definitely tired of lugging our backpacks by now, and quite frankly, anxious to get to our campsite. Our backpacks were heavier than usual because we had decided to carry all the water needed for two days. The river water contains cyanobacteria which can cause certain illnesses if consumed unfiltered. So it is strongly advised to carry filters/water purifiers if you decide to consume river water.
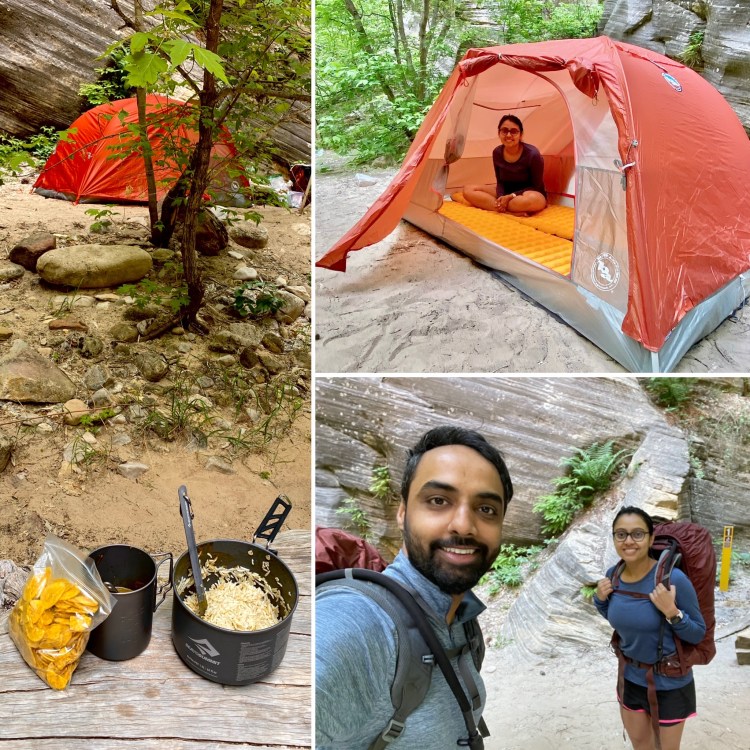
A little over half a mile further from here we reached the confluence of the Deep Creek where the river is joined by one of its many tributaries and the volume of water increases significantly. This is also the location of campsite 1, to the left of the river, where we camped.

Note: Refer to the above map for all the major milestones and campsites locations. Note that there is an inaccuracy in the location of campsites as they have been slightly offset on the map when compared to their actual locations. Campsite 1 is at the place where deep creek meets the Virgin river. On this map campsite 1 is actually where campsite 2 is shown to be, a little over half a mile further from the falls.
We reached our campsite around 3:00pm and had the entire evening to immerse ourselves in the sound of the river echoing through the canyon, and of course set up camp, cook and eat a gratifying meal. The experience of the Narrows aside, it was the tamarind rice, salted banana chips, steaming white rice and curry that motivated the South Indian in us to backpack more often. No internet, a crisp evening breeze and white noise from the river made for a sound night’s sleep.
The next morning we were all packed up and ready to leave by 9:00am, toil from the day before washed away and forgotten. As we hiked further downstream, the volume of water increased quite a bit as more tributaries join the Virgin river at different points.
Around campsite 12 (the last campsite) is where we first encountered waist deep water. There were several pools throughout where crossing required getting at least waist deep into water. It is possible to circumvent most of these spots by slightly digressing and walking on dry land on either side of the river. However, it is important to not get too close to campsites and be mindful of other campers’ privacy. There are also places where walking in waist-deep and sometimes chest-deep water becomes inevitable, mainly depends on the time of year but in any case it’s not a bad idea to enjoy the experience while in there!

Moving on, the next major milestone was Big springs featuring a second waterfall, also the turn-around point for most day-hikers taking the Bottom-up route (the right photo above). You will start to see a lot more day hikers from this section on.
The next stretch, often dubbed as the Wall Street, is where the Narrows gets deeper and darker, the canyon walls get more imposing, water levels are higher, and all in all the most gorgeous section of the hike.
Beyond Wall street, there comes a junction on the left where Orderville Canyon enters the river’s course. At this point we were left with a little over 3 miles to finishing the hike. For those interested, Orderville Canyon is a technical day-hike requiring Canyoneering experience and is supposed to be every bit as beautiful as the Narrows with the added thrill of Canyoneering!
Walking in the river and the Narrows concludes at the Riverside walk on the left. But this is where you stop, look around and soak in the expansive views of the valley before hiking up a dry, paved trail that runs about half a mile leading to the end of the hike at the Temple of Sinawava. We were here around 3:00pm on day 2 and boarded a private shuttle back to the visitor center, conveniently avoiding what seemed like a never-ending line of visitors waiting for the NPS shuttle.
General Tips & Recommendations
- A general list of backpacking essentials can be found here. The tips below are more specific to hiking the Narrows.
- Carry dry bags to protect essentials, electronics, wallet etc. from getting wet as there are several spots where water levels are chest high and/or requiring short swims. We had compacted our trash bag with mostly dry waste and placed it at the base of the dry bag. The importance of dry bags for essentials cannot be stressed enough.
- Wear quick dry clothes and carry flip flops. Once at the campsite, changing over to flip flops from wet shoes and socks is a big relief.
- There are several companies in the National Park that rent out hiking sticks, neoprene socks and canyon shoes. We highly recommend them. They usually come bundled as ‘Footwear package’ and provide immense support and stability when walking on the river bed covered with rolling stones and pebbles. We had rented ours from the Zion Adventure Company that is right next to the Visitor center (this place also offers private shuttle services).
- Avoid swimming or drinking water directly from the river due to high levels of cyanobacteria in the water. We had each carried 6 liters of water that sufficed our drinking, cooking and cleaning needs.
- It is recommended that you pee into the river. If you have to poop, you are required to pack it out using a poop kit.
- We did not feel the need for bug spray while hiking or camping but suggest carrying one if you are particularly sensitive.
- Certainly did not feel the need for bear sprays.
Checkout our recommendations for backpacking gear and a complete checklist to help you get started.
